You’ve got a website on the regular internet. Now you want to make it available on I2P too — so people can visit it privately, without revealing who they are or where they’re coming from. That’s what this guide is about.
Mirroring doesn’t replace your existing site. It adds a second entrance — a private one — through the I2P network. Your clearnet site keeps running exactly as before.

Why Mirror to I2P?
There are several practical reasons to mirror your services:
Privacy for your visitors. People can access your content without exposing their IP address. Traffic between them and your service is encrypted through multiple hops — neither you nor anyone watching the network can identify who’s visiting.
Censorship resistance. If your site is blocked in certain regions by DNS filtering, IP blocking, or other means, the I2P mirror remains reachable. It doesn’t depend on DNS or conventional IP routing.
Resilience. An I2P mirror adds redundancy. If your domain gets seized or your CDN drops you, the I2P version stays up as long as your server is running.
Supporting the network. Every service on I2P makes the network more useful and helps grow the ecosystem.
What You’ll Need
Before you start, make sure you have:
- A running I2P router on your server (the Java implementation). If you don’t have one yet, follow the I2P Installation Guide first.
- Your website or service already working — it should be serving content on your server.
- Basic command-line comfort — you’ll be editing a config file and running a few commands.
- About 15–20 minutes — that’s all it takes.
Your I2P router needs at least 512 MB of RAM and works best on a server with 24/7 uptime. If your router just started for the first time, give it 10–15 minutes to integrate with the network before creating tunnels.
Understanding Tunnels
The core concept behind I2P mirroring is the server tunnel. Here’s the idea:
When someone on I2P wants to visit your site, their request travels through several encrypted hops across the I2P network until it reaches your I2P router. Your router then hands the request to a server tunnel, which forwards it to your web server running on localhost. Your web server responds, and the reply takes the reverse path back through the encrypted network.
Your web server never touches the public internet for these requests — it only talks to localhost. The I2P router handles everything network-facing.
Which Tunnel Type Do You Need?
I2P offers several tunnel types for different situations:

For mirroring a website, you almost certainly want an HTTP Server tunnel. It’s designed specifically for web traffic and handles header filtering, compression, and hostname spoofing out of the box. The other types exist for specialized use cases like SSH access, bidirectional applications, or IRC servers.
Part 1: Mirroring a Website
This is the most common scenario — you have an existing clearnet website and want to make it available over I2P. Here’s the process at a glance:

Let’s walk through each step.
Step 1: Add a Localhost Listener to Your Web Server
Your clearnet site is probably already running on ports 80 and 443, open to the world. For I2P, you’ll create a separate listener on localhost that only the I2P tunnel can reach. This gives you full control over what the I2P version looks like — you can strip headers, block admin panels, and tune caching for I2P’s higher latency.
Quick alternative: If you don’t need any customization, you can skip this step and point the I2P tunnel directly at
127.0.0.1:80. But the dedicated listener approach is recommended.
Pick your web server:
Nginx
Create a new site config:
sudo nano /etc/nginx/sites-available/i2p-mirror
Paste this configuration, replacing yoursite.i2p and the root path with your own values:
server {
    # Only listen on localhost — the I2P tunnel connects here
    listen 127.0.0.1:8080;

    server_name yoursite.i2p yoursite.b32.i2p;

    # Point this to the same content as your clearnet site
    root /var/www/your-site;
    index index.html;

    # Don't reveal server software
    server_tokens off;

    # Security headers — note: NO HSTS (it breaks I2P access)
    add_header X-Content-Type-Options "nosniff" always;
    add_header X-Frame-Options "SAMEORIGIN" always;
    add_header Referrer-Policy "same-origin" always;

    # Restrict resources to your own site only
    add_header Content-Security-Policy
        "default-src 'self'; script-src 'self'; style-src 'self' 'unsafe-inline'; img-src 'self' data:; connect-src 'self'; frame-ancestors 'none'"
        always;

    location / {
        try_files $uri $uri/ =404;

        # Aggressive caching reduces the impact of I2P latency
        expires 1d;
        add_header Cache-Control "public, immutable";
    }

    # Cache static assets even more aggressively
    location ~* \.(jpg|jpeg|png|gif|ico|css|js|woff|woff2|svg)$ {
        expires 30d;
        add_header Cache-Control "public, immutable";
    }

    # Optional: block admin areas from I2P visitors
    location ~ ^/(admin|wp-admin|login) {
        return 403;
    }
}
Enable it and reload:
sudo ln -s /etc/nginx/sites-available/i2p-mirror /etc/nginx/sites-enabled/
sudo nginx -t
sudo systemctl reload nginx
Apache
Create a new site config:
sudo nano /etc/apache2/sites-available/i2p-mirror.conf
Paste this configuration:
<VirtualHost 127.0.0.1:8080>
    ServerName yoursite.i2p
    ServerAlias yoursite.b32.i2p

    DocumentRoot /var/www/your-site

    # Hide server identification
    ServerSignature Off
    ServerTokens Prod
    TraceEnable Off

    <IfModule mod_headers.c>
        Header unset X-Powered-By
        Header unset Server
        # Never include HSTS — it breaks I2P
        Header unset Strict-Transport-Security

        Header always set X-Content-Type-Options "nosniff"
        Header always set X-Frame-Options "SAMEORIGIN"
        Header always set Referrer-Policy "same-origin"
        Header always set Content-Security-Policy "default-src 'self'; script-src 'self'; style-src 'self' 'unsafe-inline'; img-src 'self' data:; connect-src 'self'; frame-ancestors 'none'"

        # Aggressive caching for I2P latency
        Header set Cache-Control "public, max-age=86400, immutable"
    </IfModule>

    <Directory /var/www/your-site>
        Options -Indexes -FollowSymLinks
        AllowOverride None
        Require all granted
    </Directory>

    # Optional: block admin areas from I2P visitors
    <LocationMatch "^/(admin|wp-admin|login)">
        Require all denied
    </LocationMatch>
</VirtualHost>
Then add the port, enable the site, and reload:
echo "Listen 127.0.0.1:8080" | sudo tee -a /etc/apache2/ports.conf
sudo a2ensite i2p-mirror
sudo a2enmod headers
sudo a2dismod status info
sudo apachectl configtest
sudo systemctl reload apache2
Why No HSTS?
You’ll notice both configs explicitly avoid Strict-Transport-Security headers. This is critical. HSTS tells browsers to only use HTTPS, but I2P doesn’t use traditional TLS — encryption is handled at the network layer instead. Including HSTS would lock visitors out of your I2P site entirely.
Step 2: Create the Server Tunnel
Open the I2P Router Console in your browser:
http://127.0.0.1:7657/i2ptunnel/
Click “Tunnel Wizard” to start creating a new tunnel.

Select “HTTP Server” as the tunnel type and click Next.
Step 3: Configure the Tunnel
Fill in the tunnel settings:
| Setting | Value | Notes |
|---|---|---|
| Name | My Website Mirror | Any descriptive name |
| Description | (optional) | Helps you remember what this tunnel is for |
| Target Host | 127.0.0.1 | Always localhost |
| Target Port | 8080 | Must match the port from Step 1 |
| Website Hostname | mysite.i2p | The .i2p name you want (registered later) |
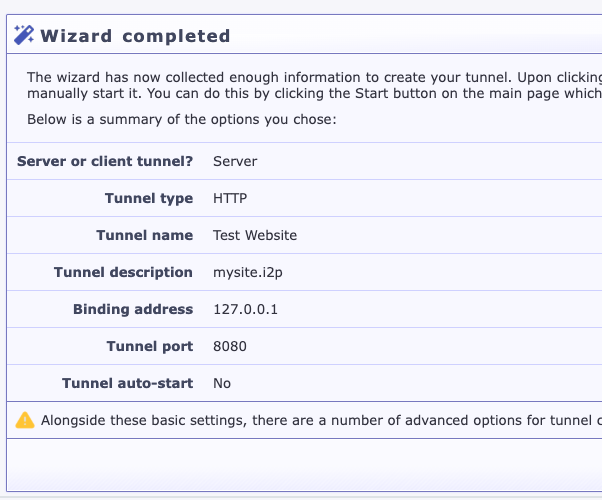
Click “Create” to generate your tunnel. I2P will create a unique cryptographic destination key — this becomes your permanent address on the network.
Step 4: Start the Tunnel and Wait
Find your new tunnel in the list and click “Start”. You’ll see:
- Local Destination — a long base32 address like
abc123...xyz.b32.i2p - Status — should change to “Running”

Be patient! The first startup takes 2–5 minutes while your tunnel builds and publishes its leasesets to the network. This is normal.
Step 5: Test Your Mirror
Once the tunnel shows as running, open your I2P-configured browser and visit your base32 address. The first page load may take 5–30 seconds — that’s typical for I2P.
If the page loads, congratulations — your site is now live on I2P!
Step 6: Register a Human-Readable .i2p Address (Optional)
Your site is already accessible via the base32 address, but abc123...xyz.b32.i2p isn’t exactly memorable. To get a clean .i2p domain:
For your own addressbook — go to http://127.0.0.1:7657/dns and add your chosen hostname mapped to your destination key.
For public discovery — register with the I2P address registry:
- Visit
http://stats.i2p/i2p/addkey.html(inside I2P) - Enter your desired hostname and your full destination key (the 500+ character string from your tunnel details, ending in “AAAA”)
- Submit for registration
Once registered, anyone with the appropriate address book subscriptions will be able to find your site by name.
Part 2: Mirroring Dynamic Applications
If your site runs on a backend framework (Node.js, Python, Ruby, PHP, etc.) instead of static files, you need Nginx or Apache as a reverse proxy between the I2P tunnel and your application.
Reverse Proxy Configuration (Nginx)
server {
    listen 127.0.0.1:8080;
    server_name yourapp.i2p;

    server_tokens off;

    location / {
        proxy_pass http://127.0.0.1:3000;
        proxy_http_version 1.1;

        proxy_set_header Host $host;
        proxy_set_header X-I2P-Request "true";

        # CRITICAL: never forward real IP headers
        proxy_set_header X-Forwarded-For "";
        proxy_set_header X-Real-IP "";

        # Strip headers that leak information
        proxy_hide_header Strict-Transport-Security;
        proxy_hide_header X-Powered-By;
        proxy_hide_header Server;

        # Extended timeouts — I2P is slower than clearnet
        proxy_connect_timeout 60s;
        proxy_read_timeout 120s;
        proxy_send_timeout 60s;
    }
}
The X-I2P-Request header lets your application detect I2P traffic if it needs to behave differently (for example, disabling features that require clearnet access).
URL Rewriting for Clearnet Mirrors
If your application generates URLs pointing to your clearnet domain, you’ll want to rewrite them for I2P visitors:
location / {
    proxy_pass http://127.0.0.1:3000;

    sub_filter_once off;
    sub_filter_types text/html text/css application/javascript;

    # Rewrite your clearnet domain to the I2P domain
    sub_filter 'https://www.example.com' 'http://yoursite.i2p';
    sub_filter '//www.example.com' '//yoursite.i2p';
}
Then create an HTTP Server tunnel pointing to 127.0.0.1:8080, just like in Part 1.
Part 3: Mirroring Git Repositories
Gitea (Full-Featured)
Gitea is a great choice for hosting Git over I2P. It has a web interface, issue tracking, and pull requests — all of which work well over the network.
Configure /etc/gitea/app.ini:
[server]
HTTP_ADDR     = 127.0.0.1
HTTP_PORT     = 3000
DOMAIN        = yourgit.i2p
ROOT_URL      = http://yourgit.i2p/
SSH_DOMAIN    = yourgit.i2p
PROTOCOL      = http
OFFLINE_MODE  = true

[service]
DISABLE_REGISTRATION    = false
REGISTER_MANUAL_CONFIRM = true
REGISTER_EMAIL_CONFIRM  = false

[mailer]
ENABLED = false

[session]
COOKIE_SECURE = false
Key points: OFFLINE_MODE = true prevents Gitea from loading external resources (avatars, CDN assets). COOKIE_SECURE = false is needed because I2P doesn’t use HTTPS in the traditional sense. Disable email since your I2P server may not have outbound email configured.
Create two tunnels:
- HTTP Server tunnel →
127.0.0.1:3000(web interface) - Standard Server tunnel →
127.0.0.1:22(SSH access for git push/pull — optional)
cgit (Lightweight Alternative)
If you just need read-only browsing and HTTP cloning, cgit is much lighter:
# /etc/cgitrc
virtual-root=/
clone-url=http://yourgit.i2p/$CGIT_REPO_URL
cache-root=/var/cache/cgit
cache-size=1000
scan-path=/srv/git
enable-http-clone=1
cgit’s aggressive caching makes it particularly well-suited for I2P’s higher latency.
Client-Side Setup for Git over I2P
Anyone cloning from your I2P Git mirror needs to route Git traffic through the I2P HTTP proxy:
# Tell Git to use the I2P proxy for .i2p domains
git config --global http.http://yourgit.i2p.proxy http://127.0.0.1:4444
git config --global http.timeout 300

# Clone (allow for I2P latency)
GIT_HTTP_LOW_SPEED_LIMIT=1000 GIT_HTTP_LOW_SPEED_TIME=60 \
    git clone http://yourgit.i2p/repo
For large repos, shallow clones save a lot of time over I2P:
git clone --depth 1 http://yourgit.i2p/project
git fetch --unshallow   # grab full history later if needed
Part 4: Mirroring File Hosting
Nextcloud
Nextcloud works over I2P with some configuration. Edit config/config.php:
$CONFIG = array(
    'trusted_domains' => array(
        0 => 'localhost',
        1 => 'yourbase32address.b32.i2p',
        2 => 'yoursite.i2p',
    ),
    'trusted_proxies'   => array('127.0.0.1'),
    'overwritehost'     => 'yoursite.i2p',
    'overwriteprotocol' => 'http',
    'overwrite.cli.url' => 'http://yoursite.i2p/',
);
What works well: file upload and download, directory browsing, authentication, public link sharing, and WebDAV. What doesn’t: desktop sync clients need SOCKS proxy configuration, external storage backends may leak IP addresses, and federation with clearnet Nextcloud instances can compromise privacy.
Simple File Server
For straightforward file hosting without the overhead of Nextcloud, a minimal Python server does the job:
#!/usr/bin/env python3
import http.server
import socketserver

class QuietHandler(http.server.SimpleHTTPRequestHandler):
    server_version = ""  # don't reveal server software
    sys_version = ""

with socketserver.TCPServer(("127.0.0.1", 8080), QuietHandler) as httpd:
    print("Serving on 127.0.0.1:8080")
    httpd.serve_forever()
Create an HTTP Server tunnel pointing to 127.0.0.1:8080.
Part 5: Mirroring APIs
Basic API Proxy
server {
    listen 127.0.0.1:8080;
    server_name api.yoursite.i2p;

    server_tokens off;

    location / {
        proxy_pass http://127.0.0.1:3000;

        proxy_set_header Host $host;
        proxy_set_header Content-Type $content_type;

        # Strip identifying headers
        proxy_set_header X-Forwarded-For "";
        proxy_set_header X-Real-IP "";
        proxy_hide_header X-Powered-By;

        # I2P-appropriate timeouts
        proxy_connect_timeout 60s;
        proxy_read_timeout 120s;
    }
}
WebSocket Support
If your application uses WebSockets (chat apps, live dashboards, etc.):
map $http_upgrade $connection_upgrade {
    default upgrade;
    ''      close;
}

server {
    listen 127.0.0.1:8080;

    location /ws {
        proxy_pass http://127.0.0.1:3000;
        proxy_http_version 1.1;
        proxy_set_header Upgrade $http_upgrade;
        proxy_set_header Connection $connection_upgrade;

        # Long timeout for persistent connections
        proxy_read_timeout 3600s;
        proxy_send_timeout 3600s;
        proxy_buffering off;
    }
}
Note that WebSockets over I2P will have noticeably higher latency than clearnet. For real-time features, consider longer polling intervals or optimistic UI updates on the client side.
Security Best Practices
Getting your mirror working is the easy part. Keeping it secure requires attention to a few details that are unique to I2P hosting.

The Big Rules
Bind to localhost only. Your service should listen on 127.0.0.1, never on 0.0.0.0. The I2P router is the only thing that should be able to reach your service.
Strip identifying headers. Web servers love to announce what software they’re running. Over I2P, this is information you don’t want to share.
| Header | What It Leaks | How to Fix |
|---|---|---|
Server | Web server software and version | server_tokens off; (Nginx) |
X-Powered-By | Application framework | proxy_hide_header X-Powered-By; |
X-Forwarded-For | IP addresses in proxy chain | proxy_set_header X-Forwarded-For ""; |
X-Real-IP | Client IP address | proxy_set_header X-Real-IP ""; |
Strict-Transport-Security | Breaks I2P access entirely | proxy_hide_header Strict-Transport-Security; |
Self-host everything. Don’t load fonts from Google, scripts from CDNs, or analytics from third parties. Every external resource is a request that exits the I2P network, adding huge latency and potentially leaking information. Download libraries and fonts, put them on your server, and serve them locally.
Never expose databases. It should go without saying, but don’t create I2P tunnels to your database ports. Server tunnels should only point to web servers or application servers.
Performance Tuning
I2P adds 2–10 seconds of latency per request. That’s the price of multi-hop encryption. But with proper tuning, your I2P mirror can feel surprisingly snappy.
Cache Aggressively
Static assets should have long cache lifetimes. If a visitor has already loaded your CSS and images, they shouldn’t have to wait for them again:
location ~* \.(jpg|jpeg|png|gif|ico|css|js|woff|woff2|svg)$ {
    expires 30d;
    add_header Cache-Control "public, immutable";
}
Enable Compression
Smaller payloads mean faster transfers over I2P’s limited bandwidth:
gzip on;
gzip_vary on;
gzip_min_length 1024;
gzip_types text/plain text/css application/json application/javascript
           text/xml application/xml application/xml+rss;
Tune Tunnel Quantity for Traffic
More tunnels mean more concurrent connections. The default of 3 is fine for low-traffic sites, but if you’re seeing congestion:
tunnel.0.option.inbound.quantity=5
tunnel.0.option.outbound.quantity=5
tunnel.0.option.inbound.backupQuantity=2
tunnel.0.option.outbound.backupQuantity=2
Tunnel Length (Hops)
Every hop adds latency but also adds anonymity. Choose based on your threat model:

For a public mirror where the server’s identity is already known (your organization’s website, for example), reducing to 2 hops is a reasonable trade-off:
tunnel.0.option.inbound.length=2
tunnel.0.option.outbound.length=2
General Router Tips
- Run your I2P router 24/7. The longer it’s up, the better integrated it is with the network, and the faster your tunnels perform.
- Set bandwidth share to at least 256 KB/sec, but keep it slightly below your actual line speed.
- Expect the first connections after a restart to be slow (30–90 seconds). This improves quickly as tunnels build.
Advanced: Manual Tunnel Configuration
The Router Console wizard works great, but if you prefer editing config files directly — or need to automate deployments — you can configure tunnels in ~/.i2p/i2ptunnel.config (or /var/lib/i2p/i2p-config/i2ptunnel.config for system installs):
# HTTP Server Tunnel
tunnel.0.name=My Website
tunnel.0.description=I2P mirror of my clearnet site
tunnel.0.type=httpserver
tunnel.0.targetHost=127.0.0.1
tunnel.0.targetPort=8080
tunnel.0.privKeyFile=mysite-privKeys.dat
tunnel.0.spoofedHost=mysite.i2p
tunnel.0.startOnLoad=true
tunnel.0.sharedClient=false

# I2CP connection settings
tunnel.0.i2cpHost=127.0.0.1
tunnel.0.i2cpPort=7654

# Tunnel pool configuration
tunnel.0.option.inbound.length=3
tunnel.0.option.inbound.quantity=3
tunnel.0.option.inbound.backupQuantity=1
tunnel.0.option.outbound.length=3
tunnel.0.option.outbound.quantity=3
tunnel.0.option.outbound.backupQuantity=1
Restart I2P after changes:
sudo systemctl restart i2p
As of I2P 0.9.42, you can also use individual config files in i2ptunnel.config.d/ for cleaner management of multiple tunnels:
mkdir -p ~/.i2p/i2ptunnel.config.d/

cat > ~/.i2p/i2ptunnel.config.d/mysite.config <<EOF
tunnel.0.name=My Website
tunnel.0.type=httpserver
tunnel.0.targetHost=127.0.0.1
tunnel.0.targetPort=8080
tunnel.0.privKeyFile=mysite-privKeys.dat
tunnel.0.startOnLoad=true
EOF
Troubleshooting
“I can’t reach my site”
Work through this checklist in order:
1. Is the web server actually listening?
nc -zv 127.0.0.1 8080
If this fails, your web server config has an issue — go back to Step 1.
2. Is the tunnel running?
Visit http://127.0.0.1:7657/i2ptunnel/ and check the status. If it says “Starting” for more than 5 minutes, check your router’s network integration.
3. Is the LeaseSet published?
Make sure i2cp.dontPublishLeaseSet is NOT set in your tunnel options. Without a published LeaseSet, nobody can find your tunnel.
4. Is your clock accurate? I2P requires time accuracy within 60 seconds. Check with:
timedatectl status
If your clock is off, I2P will have trouble building tunnels.
Slow performance after restart
This is normal. After restarting your I2P router, give it 10–15 minutes to rebuild its tunnel pools and re-integrate with the network. Performance improves as more peers learn about your router.
Also check that port forwarding is configured for your I2NP port (check the Router Console for the specific port number). Without it, your router operates in “firewalled” mode, which limits performance.
“Address not found” errors when others visit
Visitors need your address in their address book. Make sure you’ve registered with a public address book, or share your full base32 address directly. They can also add more subscriptions at http://127.0.0.1:7657/susidns/subscriptions:
http://stats.i2p/cgi-bin/newhosts.txt
http://i2host.i2p/cgi-bin/i2hostetag
Timeouts when testing
I2P has inherently higher round-trip times. When testing from the command line, use extended timeouts:
# curl
curl --connect-timeout 60 --max-time 300 http://yoursite.i2p/

# wget
wget --timeout=300 http://yoursite.i2p/
Reading the logs
If nothing else helps, check the I2P router logs for errors:
# System service
sudo journalctl -u i2p -f

# Or directly
tail -f ~/.i2p/logs/log-router-0.txt
Back Up Your Keys
This is the one thing you absolutely must not skip. Your tunnel’s private key files (.dat files in your I2P config directory) are what give your service its permanent address on the network. If you lose them, you lose your I2P address — permanently. There’s no recovery, no reset, no support ticket. You’d have to start over with a new address.
Back them up now:
# User installation
tar -czf tunnel-keys-backup.tar.gz ~/.i2p/*.dat

# System installation
sudo tar -czf tunnel-keys-backup.tar.gz /var/lib/i2p/i2p-config/*.dat
Store the backup somewhere safe and off-server.
You’re Done
That’s it. Your service is now available on both the regular internet and the I2P network. You’re giving people a private way to access your content — one where their identity stays their own.
If you run into issues or want to get more involved, here’s where to find the community:
- Forum: i2pforum.net
- IRC: #i2p on various networks
- Development: i2pgit.org
- StormyCloud: stormycloud.org
Guide created by StormyCloud Inc for the I2P community.